by ClearEvent Support | Event Management
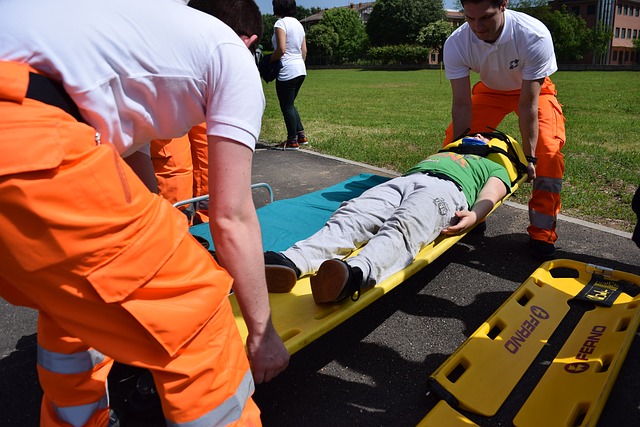
Emergency preparedness is like flossing—it’s something all event planners know they need to do, but it often ends up being an afterthought. Unfortunately, overlooking this crucial step can have serious consequences if something goes wrong. The last thing you want is for your event to be remembered as a disaster.
This guide will provide practical tips and considerations for event planners to prepare for emergencies effectively. While you can’t plan for every scenario, having a response plan for common situations ensures a safer event for attendees and peace of mind for organizers.
Why Emergency Preparedness Matters
Emergencies don’t always involve catastrophic incidents like loss of life. As Dave Leonard, CEO of Mosaic Medical, highlights, preparedness can include planning for scenarios like lost children, overcrowding, or simply deterring potential issues with visible security measures.
Emergency planning doesn’t need to feel overwhelming—it just needs to be intentional. By breaking down potential risks, creating a plan, and involving the right people, you can mitigate potential chaos and create a safe, memorable event.
What Is Your Goal?
Questions to Define Your Goals
The first step in emergency preparedness is identifying your goals during an emergency. Consider the following questions:
- Is discretion a top priority?
- Should the event continue in the face of disruption?
- How will overcrowding or unexpected incidents be managed?
- How do you want your event to be perceived in the community? Is it a positive contributor or a drain on local resources?
- Do you have a plan for communicating with attendees and the media if something goes wrong?
Managing Public Perception
Having clear objectives will shape your emergency response plan and communication strategy. For instance, social media can quickly amplify bad news. Preparing clear, concise messages that show the situation is under control is vital to managing public perception.
“The most important first step in emergency preparedness is to determine what your goals are in the event of an emergency.”
When to Start Emergency Preparedness Planning
Early Planning Is Crucial
The best time to start planning for emergencies is at the very beginning of your event preparation. Early discussions with emergency professionals can influence critical decisions, such as:
- Event layout: Designing entrances and exits for efficient crowd control and quick evacuation.
- On-site medical staff: Reducing response times for medical emergencies.
- Security presence: Deter potential issues before they arise.
Avoid Last-Minute Panic
Many planners wait until the final week to consult emergency services, which is often too late to implement key changes. Therefore, starting early ensures you can address these concerns effectively and avoid last-minute panic.
“The very beginning of planning an event is the best time to initiate discussion with emergency professionals.”
Engage Experts to Develop a Response Plan
Benefits of Professional Expertise
Emergency preparedness professionals can help you identify risks and create response plans tailored to your event. They group potential emergencies by severity and develop clear, actionable strategies for handling each scenario.
Focus on What You Do Best
Even seasoned event planners can benefit from expert advice. After all, letting professionals handle the heavy lifting allows you to focus on the other 99% of event details.
“Enlisting an outside service can help identify your goals and prepare for common scenarios.”
Training and Communication: Empower Your Team
Equip Your Team for Success
Your team is your first line of defense in an emergency. Equip them with the knowledge they need to act quickly and effectively:
- Host Pre-Event Training: Teach staff and volunteers how to assess risks, who to inform, and how to communicate clearly in a crisis.
- Assign Clear Roles: Define responsibilities for specific scenarios to avoid confusion during an emergency.
- Use Technology Tools: Platforms like ClearEvent’s messaging feature ensure all team members stay informed and aligned.
Why Training Matters
Well-trained staff will feel empowered to respond confidently, which reduces the likelihood of chaos and ensures attendee safety.
Practical Emergency Preparedness Tips
Actionable Steps to Enhance Safety
Here are actionable tips to improve your event’s emergency preparedness:
- Create an Emergency Kit: Include essentials like first aid supplies, flashlights, batteries, and portable phone chargers.
- Develop an Evacuation Plan: Map out exits, identify safe zones, and rehearse evacuation procedures with your team.
- Set Up Communication Channels: Use SMS alerts or PA systems to quickly inform attendees and staff.
- Collaborate with Local Authorities: Build relationships with police, fire, and medical services to streamline coordination during emergencies.
- Plan for Common Scenarios: Include strategies for medical emergencies, lost children, severe weather, and security threats.
Additional Resources for Emergency Preparedness
Helpful Links
To learn more, explore these helpful resources:
Final Thoughts
Emergency preparedness doesn’t have to be overwhelming. By starting early, setting clear goals, and leveraging expert advice, you can create a safer, more enjoyable event for everyone involved. Preparedness isn’t just a responsibility—it’s the key to protecting your attendees and your event’s reputation.
by ClearEvent Support | Release Notes
What’s New
Form Field Links
Our new Form Field Links features lets you link any field on a registration form to any file hosted on a website. When you set the new Link and Link Test settings for a field, a clickable link will appear below the question on the form. Registrants can click this link to open it in a new browser tab.
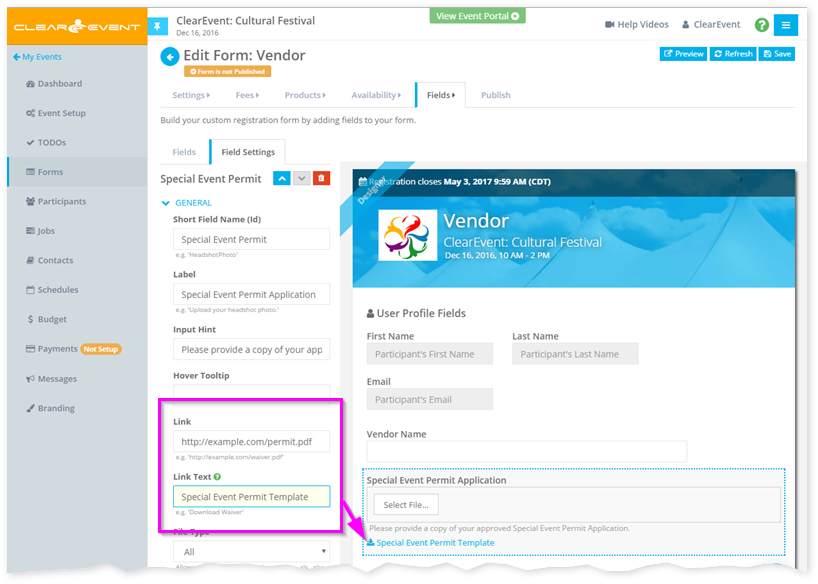
Here are a few things you can do with the new Form Field Links feature:
- Allow your food vendors to download a Health Permit Application PDF file that needs to be filled-in and submitted when they register.
- Link to a detailed waiver that volunteer registrants need to sign.
- Link to another website with more information than will fit on your form.
- Link to a Refund Policy or Terms & Conditions page on your main website.
Todo Categories
You can now assign custom categories to your Todo items. Use both the fixed Areas and customizable Categories fields to help you organize long lists of Todos.

Quickly find all Todos from a specific category by typing the category name in the Search Todos field.
Quick Delete
All Delete buttons now enable you to quick-delete the selected item by pressing & holding the SHIFT key on your keyboard and then clicking the Delete button. This combination of actions will suppress the regular delete confirmation prompt and will immediately delete the selected item.
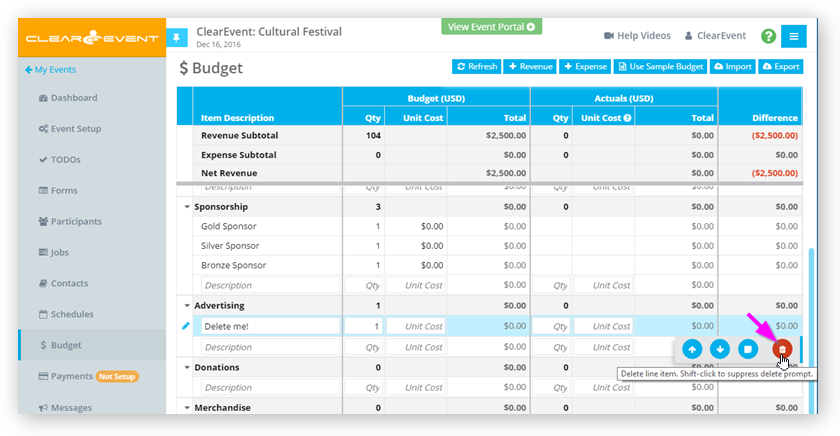
This is a great feature when you need to delete a lot of data. However, please remember that with great power, comes great responsibility! So do be careful with this new feature.
Other Improvements & Fixes
- Enhanced the visual appearance of the Event Manager App > Form Designer to make it more obvious which custom form fields have configuration errors.
- Enhanced the registration forms to make required fields more obvious to registrants.
- Fixed an intermittent load failure that prevented the Event Manager App and some registration forms to not loading reliably and require some users to click their browser’s Refresh button.
by ClearEvent Support | Release Notes
What’s New
Form Field Links
Our new Form Field Links features lets you link any field on a registration form to any file hosted on a website. When you set the new Link and Link Test settings for a field, a clickable link will appear below the question on the form. Registrants can click this link to open it in a new browser tab.
Here are a few things you can do with the new Form Field Links feature:
- Allow your food vendors to download a Health Permit Application PDF file that needs to be filled-in and submitted when they register.
- Link to a detailed waiver that volunteer registrants need to sign.
- Link to another website with more information than will fit on your form.
- Link to a Refund Policy or Terms & Conditions page on your main website.
Todo Categories
You can now assign custom categories to your Todo items. Use both the fixed Areas and customizable Categories fields to help you organize long lists of Todos.
Quickly find all Todos from a specific category by typing the category name in the Search Todos field.
Quick Delete
All Delete buttons now enable you to quick-delete the selected item by pressing & holding the SHIFT key on your keyboard and then clicking the Delete button. This combination of actions will suppress the regular delete confirmation prompt and will immediately delete the selected item.
This is a great feature when you need to delete a lot of data. However, please remember that with great power, comes great responsibility! So do be careful with this new feature.
Other Improvements & Fixes
- Enhanced the visual appearance of the Event Manager App > Form Designer to make it more obvious which custom form fields have configuration errors.
- Enhanced the registration forms to make required fields more obvious to registrants.
- Fixed an intermittent load failure that prevented the Event Manager App and some registration forms to not loading reliably and require some users to click their browser’s Refresh button.

by ClearEvent Support | Event Management
When planning online registration and ticket sales, you may be tempted to include an option for payment by check. Payment by check is a bad idea for several reasons. A key drawback of check payments is the delay and additional manual work they create, but there are other downsides too. If you can’t eliminate check payments, the next best option is to avoid check payments in your event as much as possible.
It’s important to get proceeds from registrations fast. Here’s three easy methods to help protect your time and revenue from the drawbacks of check payments by avoiding check payments.
Minimize the number of checks you deal with
One of the simplest ways to save yourself a lot of wasteful busy-work dealing with checks is to charge more for check payments.
Charging more for for payment by check both discourages customers from paying by check and encourages them to take advantage of paying by credit card.
Charging 20-25% more is a reasonable starting point. (There may be other factors in your event that lead you to set your “check payment” price higher or lower.) For example, suppose you have an exhibitor fee of $100 to be paid online by credit card. The same exhibitor fee when paying by check can be set to $120 or $125.
Charging more for check payments provides you a little compensation for the additional work you’ll be doing to manually process checks. For a $100 registration fee you’ll collect $20-$25 to cover your time and risk for manually handling check payments. As you can see, this barely covers the cost of your time! This is a good reason to avoid check payments altogether.
2) Help your check customers in pay by credit card
Some of your customers prefer to pay by check because they don’t have a credit card. Many event systems, such as ClearEvent, accept pre-paid credit cards which is a great option if the buyer does not have a bank-issued credit card.
Publish suggestions on your website and on your registration form where your customers can purchase pre-paid credit cards to help avoid check payments.
This approach also helps to minimize the number of bad checks you’ll have to clean up. Resolving bad checks is often a drain on time and resources as well as damaging your relationship with your bank.
3) Make check payment options less prominent
It’s best if most registrations use credit card payments, so structure your registration fees by putting credit card payment methods in the top positions. ClearEvent provides a lot of flexibility in setting up your registration forms. Fees can be grouped and ordered so you can organize your registration options as needed.
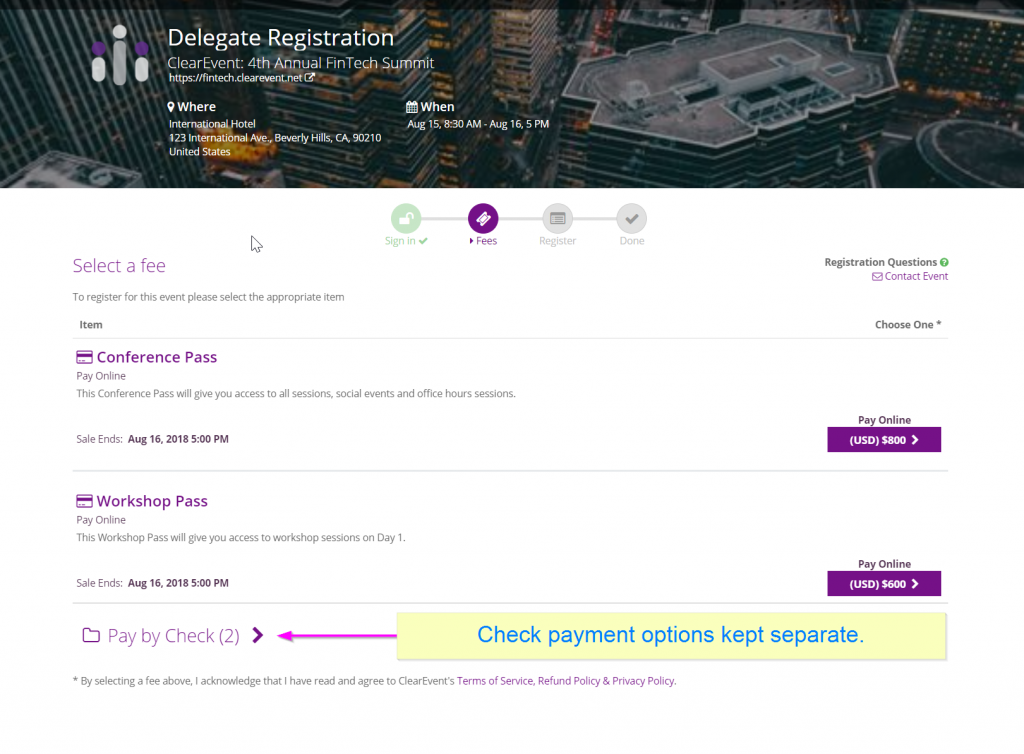
Keep check payment options separate and less prominent.
On your fees page, put your registration fees with credit card payment at the top and list your check options lower in your list of fees.
Alternatively, you could create a group of fees labelled “Pay by Check” and include only check payments in this section. This minimizes confusion between credit card payments and check payments and makes it more likely your registrants will register using online credit card payment.
Smart Planners Avoid Check Payments
If your event accepts check payments, take steps to minimize the number of check payments as much as possible. This minimizes wasted time and effort processing manual payments. It also ensures the majority of your revenue is available within days rather than weeks.
Charging more when accepting check payments provides an incentive to pay by credit card instead. Providing helpful suggestions and recommendations to your registrants about using pre-paid credit cards can further lower the work and risk of dealing with checks. Lastly, make the check options less prominent on your form to encourage more attendees to register using credit card.
These steps go a long way toward minimizing the impact of check payments, freeing you to focus on the bigger more important aspects of your event.
Happy Planning!
ClearEvent provides a great deal of flexibility to manage payments for your event, even check payments. Learn more here.
Interested In Other Topics?
As a conference planner, knowledge is key. Let us know the topics you’d like to hear about to help increase your event planning success, at support@clearevent.com.
In the meantime, Happy Planning!
